
i3D Workbench · CAM tool Available
LaserX
Bitmap processor for laser engraving — adjust image, set power and aspect ratio, export as laser toolpath.
LaserX converts a BMP, PNG or JPG image into a laser-engraving toolpath at 250, 300, 330 or 500 DPI. It offers brightness, contrast, gamma, blur, sharpen, threshold, invert, black-and-white and pointillist (dot) modes, maps brightness linearly to laser power between Min and Max % (default 20–80 %), corrects axis calibration with X/Y aspect ratio and exports G-code with M10/Q power words through a configurable post-processor.
| Group | CAM |
|---|---|
| Status | Available |
| Input | BMP, PNG, JPG |
| Output | TXT / G-code laser toolpath, PNG (processed preview) |
| Max upload | 300 MB per file |
| Runs in | Desktop browser with WebGL 2 (Chrome, Edge, Firefox) — computation on Ahaborg's C++ backend |
| Billing | Pay-per-use credits, no subscription |
| Documented in | i3D Workbench User & Reference Manual v2026.10 |
Overview
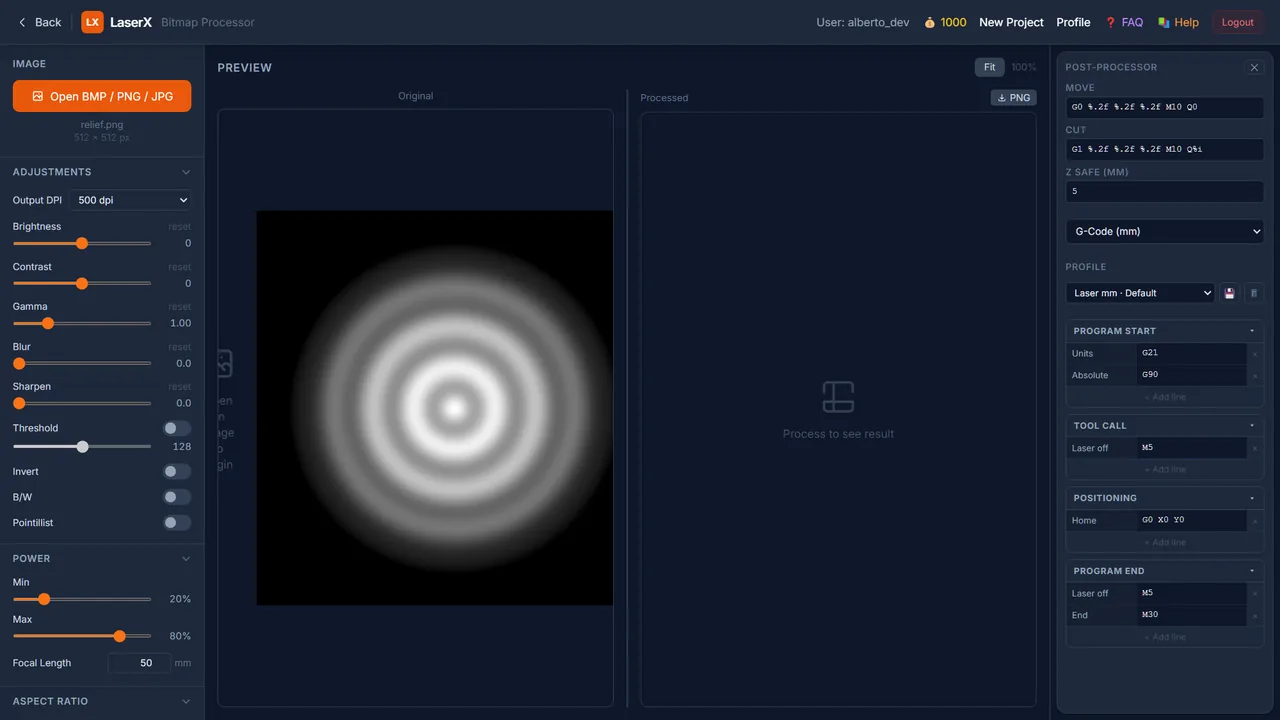
Open a BMP, PNG or JPG image. Adjust the image with sliders in real time — changes are debounced 500 ms and processed automatically. The left panel shows the original image; the right panel shows the processed result. Click Process to force an immediate update; click Download Result to export the laser toolpath file.
Step by step
- Open LaserX and click Open BMP / PNG / JPG. The image and its pixel size appear on the left.
- Pick the Output DPI matching your laser’s resolution.
- Tune Adjustments (brightness, contrast, gamma, blur, sharpen) while watching the processed preview on the right.
- Choose a mode: continuous grayscale (default), Threshold / B/W for pure line art, or Pointillist for dot engraving.
- Set Power Min/Max and the Focal Length; correct axis calibration with Aspect Ratio if needed.
- Check the Post-Processor templates (Move/Cut, Z safe, program start/end) for your controller.
- Click Process if needed, then Download Result. Inspect the file in NC Viewer.
Controls
Adjustments group
| Control | Range / values | Default | What it does |
|---|---|---|---|
| Output DPI | 250 · 300 · 330 · 500 | 500 | Resolution of the output toolpath. |
| Brightness | −100 … +100 | 0 | Shifts all pixel values lighter or darker. Reset restores 0. |
| Contrast | −100 … +100 | 0 | Expands or compresses the tonal range. |
| Gamma | 0.10 … 4.00 | 1.00 | Non-linear brightness correction. Below 1 brightens midtones; above 1 darkens them. |
| Blur | 0 … 20 | 0 | Gaussian blur radius. Smooths the image before laser processing. Useful for noisy photos. |
| Sharpen | 0 … 5 | 0 | Unsharp mask strength. Enhances edges and fine detail. |
| Threshold + toggle | 0 – 255 | 128 (off) | Converts the image to pure black and white at the cutoff. Also auto-enabled when B/W is on. |
| Invert | — | off | Inverts all pixel values (negative). Useful when the laser burns dark areas. |
| B/W | — | off | Forces grayscale conversion. Threshold activates automatically. |
| Pointillist + Dot size | 0.5 – 20 | off | Converts the image to a dot pattern; Dot size controls dot diameter. |
Power group
| Control | Range / values | Default | What it does |
|---|---|---|---|
| Min Power (%) | 0 – 100 | 20 | Laser power for the lightest tones. |
| Max Power (%) | 0 – 100 | 80 | Laser power for the darkest tones. Brightness is mapped linearly between Min and Max. |
| Focal Length (mm) | — | 50 | Focal distance of the lens; written to the output for depth/power compensation. |
Aspect Ratio group
| Control | Range / values | Default | What it does |
|---|---|---|---|
| X % / Y % | — | 100 / 100 | Scale the output toolpath coordinates along each axis independently. Useful to compensate machine axis calibration errors. |
Post-Processor (right panel)
| Control | Range / values | Default | What it does |
|---|---|---|---|
| Move | — | G0 %.2f %.2f %.2f M10 Q0 | Format string for rapid (laser off) moves. |
| Cut | — | G1 %.2f %.2f %.2f M10 Q%i | Format string for laser-on moves. %i is replaced by the power value. |
| Z safe (mm) | — | 5 | Retract height used by the Move template. |
| Processor / Profile | G-Code (mm) · … | — | Flavor and saved profile (💾 save, 🗑 delete). Sections: Program start, Tool call, Positioning, Program end — each a list of editable lines. |
Actions
| Control | Range / values | Default | What it does |
|---|---|---|---|
| Process | — | — | Force immediate server processing with current settings. |
| Download Result | — | — | Export the processed toolpath as a text file via /laserx/export. |
| ⤓ PNG | — | — | Downloads the processed preview as PNG. |
| Fit / 100 % | — | — | Preview zoom. |
Tips & tricks — LaserX
- Match Output DPI to the laser spot: a 0.1 mm spot ≈ 250 dpi. Higher DPI than the spot can resolve only burns the same pixels twice.
- Photos: Blur 1–2 to kill sensor noise, then Sharpen 1–2 to bring edges back; adjust Gamma (0.7–0.9) on wood, which darkens more than the preview suggests.
- Set Min Power just above the threshold where the material starts to mark (test with a 10-step gray wedge); otherwise light tones disappear.
- Use Invert on materials that turn light when lasered (anodized aluminium, slate, black acrylic).
- For logos and text, use B/W + Threshold; for photos on wood try Pointillist with a dot size ≈ 2× the spot — dots avoid the muddy look of continuous shading.
- The last processed result is restored on page reload (stored in the browser), so you can close the tab and continue later.
- All parameter groups are collapsible — click the group header to save sidebar space.
Troubleshooting
The processed panel stays on “Process to see result”.
Click Process once; automatic processing starts after the first manual run or the first slider move.
Download Result is disabled.
It enables after a successful Process.
The engraving is stretched.
Use Aspect Ratio X %/Y % to compensate, or check the steps/mm of the machine.
Works well with
Tools that chain with LaserX — see the workflows.